After a week or so of struggling with having visual studio slow down considerably while working with ASP.NET projects, I became desperate and started wondering why this was happening.

I’m taking about full CPU usage by Visual Studio, and I’m luckily working on a core i7 workstation.

I mean, it was as bad as waiting 20 real seconds between pressing a key and seeing the letter pop up in Visual Studio, never mind that the most efficient way to actually close Visual Studio became the all mighty the Task Manager.

It appears was not not the only one with this issue, and it also happened while using Visual Studio 2015 preview.

Apparently there is a small feature called Browser-Link that is causing all the fuss and, luckily, after disabling it VS came back to normal and all was good.

If you are having the same issue as I was, then the solution is pretty simple. Just disable the Browser-Link:

BLD

Disabling Browser Link in VS2015

It’s pretty much the same in VS2013, just look for that clockwise-arrow (the opposite of restart which you can see next to the stop sign).

Done! Happy – unhindered – programming!

1. Introduction

1. Introduction
2. The Lab Environment
3. The Migration
…3.1 Migrating the Domain Controller

In this post I will explain how to migrate several roles (Active Directory Domain Controller, DNS Server, DHCP Server, WINS Server) from Windows Server 2003 (WS2K3) to Windows Server 2012 (WS2012).

Fortunately for everyone, it is not necessary to go through Windows Server 2008/R2 (WS2K8/R2) to do this.

Because it is fairly common (although not recommended) to see small organizations with several roles in the same server, I will assume this is the case and build this lab with only one Windows Server 2003, and only one Windows Server 2012. Of course these roles could be distributed in several different servers.

BE WARNED:

You must make sure that your domain functional level and your forest functional level is updated to WS2K3 and it is not in Windows Server 2000 (WS2K). Otherwise it will not work.

You can raise the Domain Functional Level from the Active Directory Users and Computers management console, and the Forest Functional Level from the Active Directory Domains and Trusts management console, as shown in the following image .

Raise Domain and Forest Functional Level

Note that to raise the domain functional level you must right click the domain item (in this case szytech.com), and to raise the  forest functional level you must right click on the Active Directory Domains and Trusts item.

2. The Lab Environment

I have set up 3 virtual machines, one client (RICK-CL01) with Windows 8, and two servers, RICK-WS2k3 with the roles specified above (AD DC, DNS Server, DHCP Server and WINS Server) already configured, and a brand new install of Windows Server 2012 (RICK-WS2012).

The client is already registered in the domain

Set up the WS2k3 domain controller with a fixed IP address (in this example we are going to use 192.168.2.1).

The domain we will be using is szytech.com

Migration Virtual Machines

So we will open our Windows Server 2003 VM and check out the current active roles:
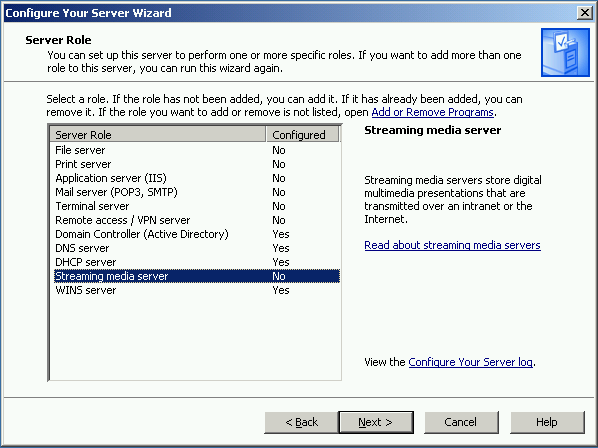
WS2K3 Roles

To add a couple of things and show the migration actually works, I am going to add a couple of users. Because I am very creative I will name them Jane Doe (jane.doe) and John Doe (john.doe). You should go ahead and add a couple of groups if you want and whatever else you want to migrate in your actual domain.

3. The Migration

Note that you cannot do an in-place upgrade of Windows Server 2003 to Windows Server 2012, and while it is possible to do so from WS2k8 r2, it is usually adviced to do it side-by-side.

First things first.

After installing Windows Server 2012,  let’s start by adding the WS2012 to the domain.

To do this we:

  1. Open the Server Manager
  2. Click on Local Server
  3. Click where it says Workgroup
  4. Click the Change… button where it says “To rename this computer or change its domain or workgroup click Change”.
  5. First name the server DC2012
  6. Next select Domain from the groupbox and type your domain name. In this case, we will type szytech.com. This should result in a dialog box asking for an authorized username
  7. It will ask you to restart your computer, so go ahead.

Done!

3.1. Migrating the Domain Controller

We are going to migrate de Global Catalog AND the DNS Server (only those ones that in this step.

A few considerations regarding migration of Active Directory:

  • Migration is straight forward as long as your schema has not been modified (no added attributes). If this happened then you must be careful because it might cause problems with newer versions if new fields added in a newer version have the same name as the fields your applications have added. This should be tested before going into production servers.
  • DNS Zones that are not integrated into Active Directory will not be migrated and should be transfered manually. This post includes how to do this, here.

So ahead we move with the Migration of the Domain Controller.

To do this, we will first promote our newly added server to a Domain Controller.

  1. At the server manager click Manage/Add Roles and Features
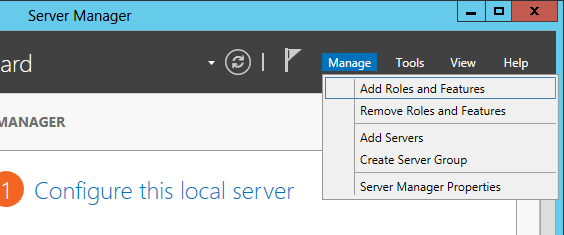
WS2012 Add Roles and Features

  1. Next follow the wizard and when you arrive at the Server Roles step, check Active Directory Domain Services
  2. Click Next
  3. When asked to add required features, click on Add Features
  4. Click Next twice until you get to the Confirmation step
  5. Check the “Restart the destination server automatically if required” checkbox
  6. Install

After the installation is complete, we are ready to promote the server to a domain controller.

We can do this from three different places, choose the one that suits you best: straight from the installation window, from the notification flag, as shown in the following figure, or through the AD DS tab.
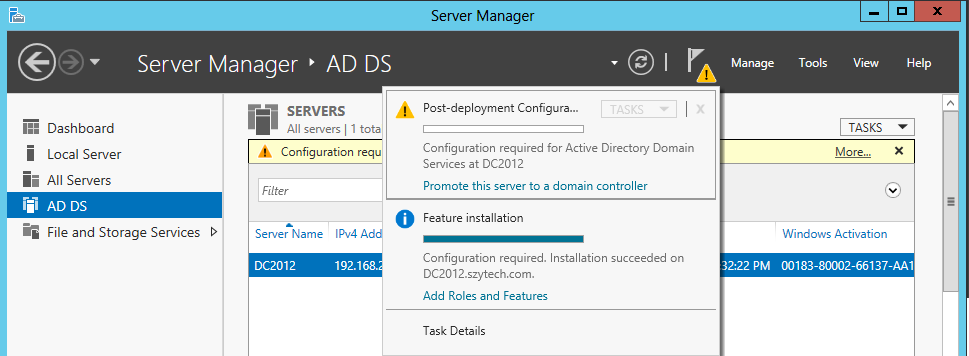
AD DS

  1. Click Promote this server to a domain controller

It should open the following wizard
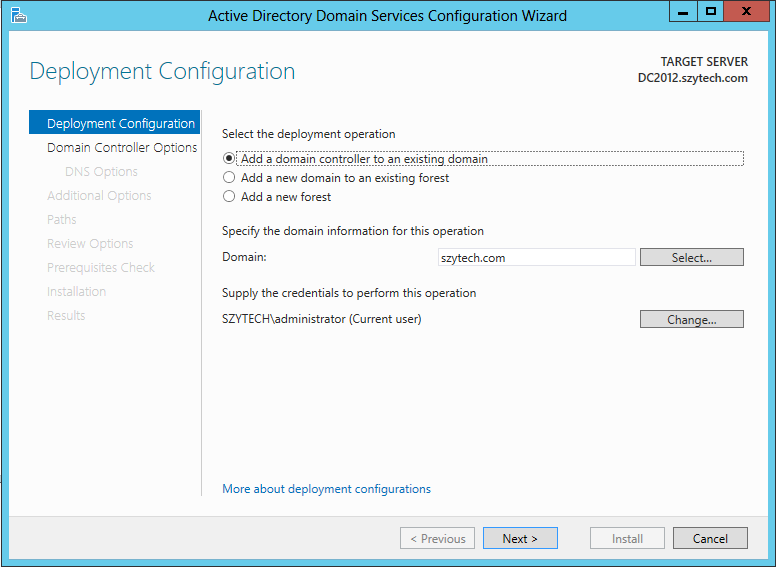
Domain Controller

  1. Select “Add a domain controller to an existing domain”
  2. Domain: szytech.com (for this tutorial)
  3. Select the appropiate credentials (enough permissions)
  4. Click Next

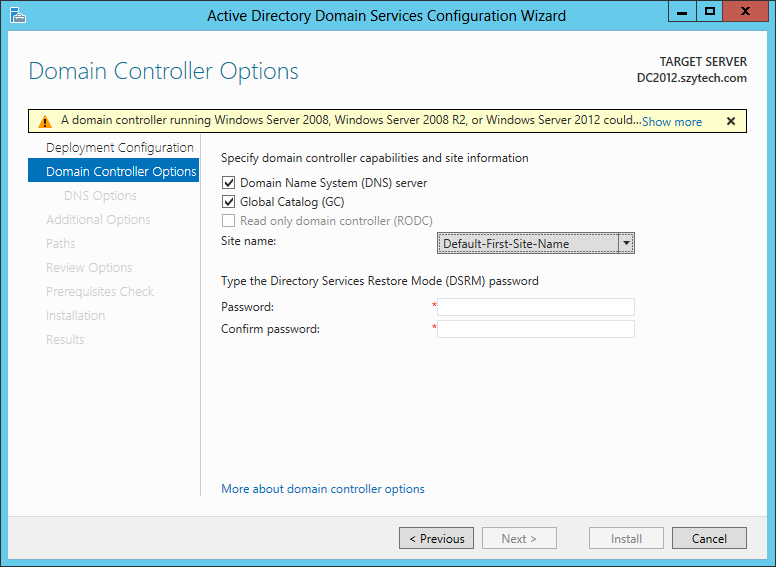
DomainControllerOptions

In the above image, the warning states that because there is no Windows 2K8+ Domain Controller, we cannot make this server a Read-Only Domain Controller, but nothing to worry about for now, because this is not what we need.

  1. Check “Domain Name System (DNS) server”.
  2. Check Global Catalog (GC).
  3. Select the appropiate Site name (in this case we will go for the default, Default-First-Site-Name)
  4. Type the DSRM password. Because we are very original, we will type password1!.
  5. Click Next.
  6. Ignore the DNS Options part, it doesn’t apply right now. Click Next.
  7. We are going to replicate the information from the Windows 2K3 server (DC01) so if you are following this tutorial step by step, choose that one. Click Next.
  8. We are leaving the default paths. Click Next.
  9. Review that all the options are correct. Next.
  10. It’s going to check that all the prerequisites are OK.
  11. Install!

If everything goes well we should see the following:
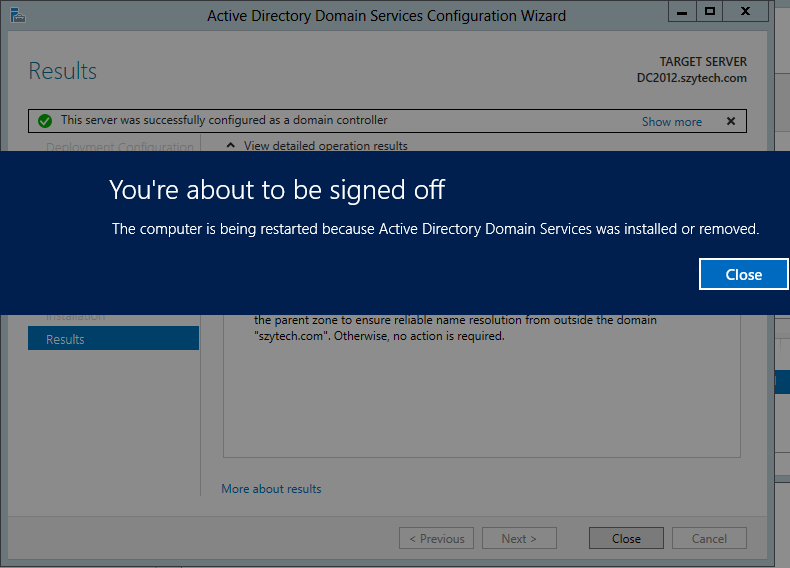
AD Install Finished

  1. Close and restart.
  2. Log-in
  3. Take a look at the server manager. Does it look like the following?
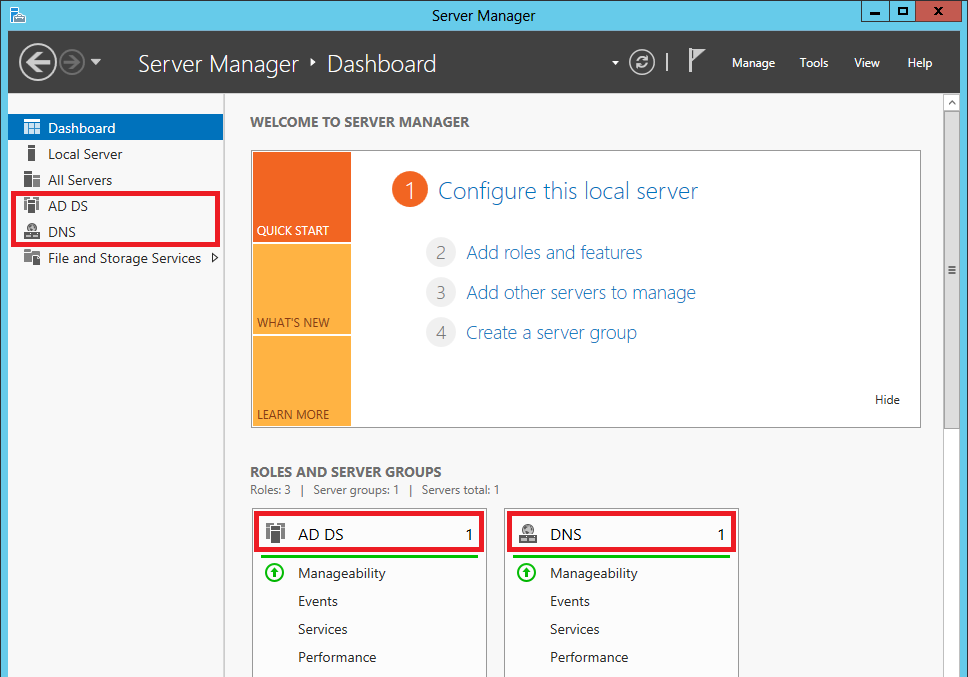
AD Installed

If you do then… It lives!

To finish, you just need to change the Operation Masters.

There are several ways to do this, one being using the Active Directory Module for Windows PowerShell (which you can access from the Tools menu in the Server Manager console), with the following script:

Move-ADDirectoryServerOperationMasterRole -Identity “DC2012”
                                          -OperationMasterRole SchemaMaster,DomainNamingMaster,PDCEmulator,RIDMaster,InfrastructureMaster

Note that -Identity “Name” should include the name of the servers you want to migrate the Operation Master Roles.

Now just check the Active Directory Users and Computers tool which you can access from the Tools menu in the Server Manager.

Your users should be replicated (in our case John and Jane Doe are there). Also check the domain controllers.

Finally, go to the DNS manager to verify that the AD integrated zones are also here, as is the case with our result:
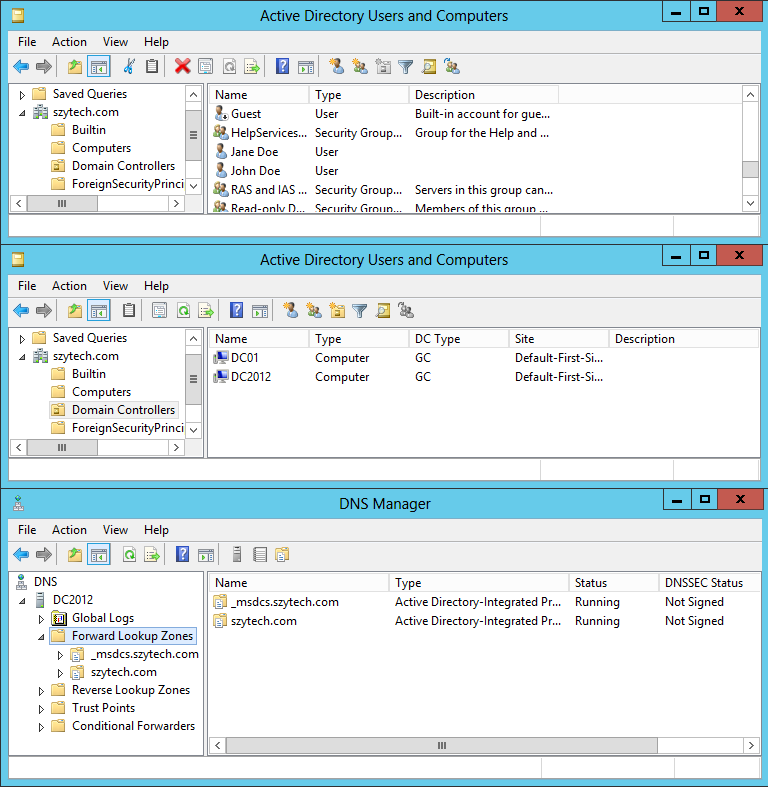
AD Check

Note that those zones that are not integrated with Active Directory, do not appear.

Check out Part 2 of this series to see how to migrate all the zones in the DNS Server (those that are not integrated into AD) and DHCP Server.

Please leave any comments below!

The What
I’m aware this might not be the best approach to tackle this, but I’m a fan of learning several things at the same time.

For this reason, I’m going to develop a Modular application in WPF, using the MVVM pattern, to access and edit the Active Directory.

The idea is that through the application you’ll be able to create new attributes for objects within the Active Directory, or new classes, define new object types, and also load modules (read: dlls) that will allow you to view these attributes the way you want to.

I’ll be providing links to other posts in order to go deeper into the different topics. This is a post that I’ll be updating as I do this, so bare with me and please feel free to leave feedback. Let me know if you are interested in this topic, or if you are interested in taking a look at something related to this.

Also, if you know/think something could be done better (probably there are 1000 better ways to do this), feel free to let me know. I’m in this for the knowledge :).

The Why
I’ve seen that a lot of people and companies asking how to add pictures to Active Directory users. Surprisingly, this is NOT SIMPLE, or at least not as straight-forward as I thought.

There are a few resources for this, but I was interested in learning how to do it, so lets share it with everyone.

Here’s one with some good links as well from the ITPro’s blog. The fact that we have the same wordpress theme is mere coincidence!

The How

First, to apply the MVVM Pattern, I am using Laurent Bugnion’s MVVM Light Toolkit. Very simple and easy to use and start applying the MVVM to decouple the user interface from the code and avoid using the code behind as much as possible.

A few ActiveDirectory resources that I’m finding very useful:

(Almost) Everything in Active Directory in C#
Searching the Directory
Search Filter Syntax
Quick List for C# Code Examples

Great WPF and MVVM resources:

Under construction 🙂

So visual studio comes with a LOAD of features, most of which we will never use.

Nevertheless, there are a few of these things to consider that, with some practice, will speed up your coding time.

So first things first:

Useful Hotkeys

Go to definition: F12
Use this whenever the cursor is over a member, a class or a method and you need to know what it does. It will take you straight to it.

Find all references: Shift + F12
Need to know where a method, property or attribute is being referenced? Just stand on top of it and press those keys. The results will show up, showing you every place where it is being used.

Clipboard stack
Are you copying a lot of stuff, and going back and forth because you need to copy the same things over and over again? Not anymore!

When pasting just press Ctrl + Shift + V and you will cycle between the last 20 things you Ctrl+C’d 🙂

Yay! No more going around the files and trying to find out what you had to copy!

Find [and Replace]
Well Find is pretty standard: Ctrl + F

However, if you were wondering how to go straight to replace: Ctrl + H does the trick.

Full Screen Mode

Are you coding on a small screen, or low resolution (say round 1024×768 ugh, or 1280×720)?

Full Screen is the way to go!. Toggle between Full Screen and Standard mode by just pressing Shift + Alt + Enter

Click for full size

Visual Studio 2010 Programming in full screen mode.

Regions

Regions are a great feature to use in Visual Studio, allowing us to keep all our code organized.

The following code is not that long, but already has a “lot of stuff”, and adding more methods can make things unmanageable later.

using System;
using System.Collections.Generic;
using System.Linq;
using System.Text;

namespace Sample_App
{
    public class Employee : IPerson
    {
        //The attributes
        private List _children = null;

        //The properties
        public DateTime Birthdate { get; set; }
        public string Name { get; set; }

        //Here are the constructors
        public Employee(DateTime Birthdate, string Name, IEnumerable Children)
        {
            this.Birthdate = Birthdate;
            this.Name = Name;
            this._children = new List(Children);
        }
        #region
        public Employee()
        {
            this.Birthdate = DateTime.MinValue;
            this.Name = "Mr. John Doe";
            this._children = new List();
        }

        //Here we implement the IPerson interface
        public int IPerson.GetAge()
        {
            return (int)((DateTime.Now - this.Birthdate).TotalDays / 365);
        }

        public bool IPerson.HasChildren()
        {
            return this._children.Count > 0;
        }
    }
}

Using the #region keyword we can simplify how we code, viewing only the portions of the code that we are working on, or that we need. Here’s a collapsed version of our code, and we can work only with what we need, reducing visual noise:

#region using
using System;
using System.Collections.Generic;
using System.Linq;
using System.Text;
#endregion

namespace Sample_App
{
    public class Employee : IPerson
    {
        #region Attributes

        private List _children = null;

        #endregion

        #region Properties

        public DateTime Birthdate { get; set; }
        public string Name { get; set; }

        #endregion

        #region Constructors
        public Employee(DateTime Birthdate, string Name, IEnumerable Children)
        {
            this.Birthdate = Birthdate;
            this.Name = Name;
            this._children = new List(Children);
        }

        public Employee()
        {
            this.Birthdate = DateTime.MinValue;
            this.Name = "Mr. John Doe";
            this._children = new List();
        }
        #endregion

        #region IPerson Members
        public int IPerson.GetAge()
        {
            return (int)((DateTime.Now - this.Birthdate).TotalDays / 365);
        }

        public bool IPerson.HasChildren()
        {
            return this._children.Count > 0;
        }
        #endregion
    }
}

Suppose now we are adding new methods, and that all we need to be looking at is the attributes and properties:
(Note: The + symbols in Visual Studio will allow you to expand those regions.)

Use the command window

I didn’t even know what this was. But it is awe-some. Press Ctrl + Alt + A and the command window pops up.

What now? Type what it is that you want to do. Heads-up: There’s IntelliSense as well!

From here you can access pretty much everything that is available from the UI.

For example: Want to replace the name of a property?

Edit.Replace findwhat replacewith [/all] [/case] [/doc|/proc|/open|/sel] [/hidden] [/options] [/reset] [/up] [/wild|/regex] [/word]

Type:

>Edit.Replace name1 name2 /all

Of course doing this each time is very tedious. Luckily the folks at Microsoft thought of the alias keyword:

Try the following

>alias rep Edit.Replace /all
>rep name1 name2

Hah!
So here you have a much faster replace than going for Ctrl + H then typing into one box, then typing into the other.

There are lots of commands, which you can take a look at here.

Edit multiple lines

This is another pretty useful feature.

It allows us to, for example, modify the visibility of several attributes simultaneously; again saving us time.

To do this, place the cursor where you want to edit, and move it while pressing Alt + Shift:

Hope this guide is useful, and if you have any more tips, let me know and i’ll include them in this post!

Have a great day!

Hey all!

Recently I came across what seems a quite common problem. Specially if you travel or have had to connect to different networks where you need different configurations to get your job done.

As I got tired of manually changing the IP Configuration from the Network Settings window, my next goal was to create a simple script file that would allow me to do this in a very simple way.

Batch scripting can be VERY tricky, specially if you are not careful with the syntax, and you are using it as you are learning :).

So here it goes:

@ECHO OFF

set varIP=192.168.0.2
set varMK=255.255.255.0
set varGW=192.168.0.1
set vardns1=127.0.0.1
set intID="Wireless Network Connection"

ECHO Setting IP properties.

netsh int ipv4 set address %intID% static %varIP% %varMK% %varGW% 1

ECHO IP Properties set.
ECHO Setting DNS Properties

netsh int ipv4 set dns %intID% static %vardns1%

pause

Easy.

Now, this solves the issue, but unfortunately I needed a couple more files for different tests, so I decided to write something a bit longer (and tidier).

First, I want to know what interfaces are active, and easily be able to choose them. Hence, the following:

@ECHO OFF

ECHO Choose the interface (input the id):

setlocal EnableDelayedExpansion

FOR /F "tokens=1,5,*" %%A IN (‘netsh int ipv4 show interfaces’) DO (
SET initString=%%A

REM These next three lines just format the output table nicely,
REM they will be explained later.
call :strlen resLen !initString!
call :getNiceString resultString !resLen! 5 !initString!
ECHO !resultString! %%B %%C
)

REM Get the input from the user
set /P intID=Type interface ID: %=%

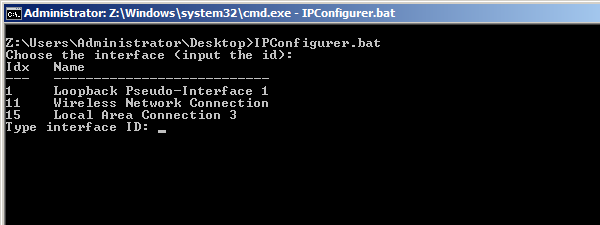
And the output nicely put:

The different interfaces available and their IDs

Note in the code above that the FOR loop goes through all each line of what comes out of the ‘netsh int ipv4 show interfaces’ command, and this gives a lot of unwanted information.
I just want the first and fifth columns, which is why I select the 1st, the 5th and whatever comes after that (in case an interface has a name consisting of 1+ words). Note that by default, ” ” (space) is taken as the delimiter.

Now that I have the interface, I want to know whether to choose the default DHCP configuration, or whether I need a specific profile:

[bat firstline=”19″] ECHO Do you want DHCP? (y/n)

set /P answer=Type answer: %=%

if "%answer%"=="y" (

REM configure IP and DNS for the given DHCP
netsh int ipv4 set address %intID% dhcp
netsh int ipv4 set dns %intID% dhcp

) ELSE (
ECHO Choose your configuration file:
set /a var=1
REM list the files in the directory which contain ".bat" in their names
REM and save them in an array (there are no arrays in batch scripting), explained later.
FOR /F %%F IN (‘DIR /B /oN^|FIND /i "bat"’) DO (
REM check that the file being listed is not the running file
set varF=false
if %%F == %0 set varF=true
if /I "%%F" EQU "%0.bat"; set varF=true
if !varF!==false (
set __Files.!var! = %%F
ECHO !var! – %%F
set /a var = !var!+1
)
)
REM Ask for the file number
set /P file=Type file number: %=%

REM this might seem confusing at first. The SET __Files.X command
REM where X is a number, returns a line similar to this:
REM __Files.X = some_value. And because "some_value" is what matters,
REM we need to split that line in two tokens. How to do it:
FOR /F "tokens=2* delims=.=" %%A IN (‘SET __Files.!file!’) DO (
ECHO Starting profile %%B
START %%B %intID%
ECHO Profile %%B succesfully started.
)
)
endlocal
pause
goto :eof
[/bat]

Finally, if you check out lines 12 and 13 in the second block of code (“Getting the available interfaces”), the code for those function calls is the following:

[bat firstline=”62″ title=”Printing a table nicely” collapse=”1″] REM the following portion of code is here just to print things nicely
REM gets the necessary number of spaces to add to a string and returns
REM the value in the first parameter.
:getNiceString <resultString> <strLength> <resultLength> <initString>
(
set /a diff = %~3 – %~2
set resString=%~4
FOR /L %%i in (1,1,!diff!) DO (
REM note the space at the end of the following line
set resString=!resString!
REM right here ^
)
set "%~1=!resString!"
exit /b
)

REM gets the length of a string variable
:strlen <resultVar> <stringVar>
(
set string=%~2
set len=0
:loop
if "!string!" NEQ "" (
set string=!string:~1!
set /a len=!len!+1
goto loop
)
)
(
set "%~1=%len%"
exit /b
)
[/bat]

Done!
Now all you need is to put the main file in a folder along with the profile files that you want, and then just select the profile of your choice.
Hope you found this useful!

The main file:

IPSetup

Sample profiles:

Home

Office

This is a hello world where i’ll be testing the code section:

//Java
public static void main(string[] args){
      System.Out.Println("Hello World!");
}
//C#
public static void Main(){
      Console.WriteLine("Hello World!");
}